2012년 2월 28일 화요일

How to build Android application package (.apk) from the command line using the SDK tools + continuously integrated using CruiseControl.

How to build Android application package (.apk) from the command line using the SDK tools + continuously integrated using CruiseControl.

Hello all android developers, I just want to share my experience building android apk manually using sdk tools without using Eclipse.  My original goal is motivated firstly by the desire to incorporate continuous integration aspect to Android development process and secondly to ditch the ADT eclipse plugin since the plugin auto-build process blocks Eclipse UI if you have large resources, assets in your Android project,  and a slow computer like mine.  I am using CruiseControl as my continuous integration tool.
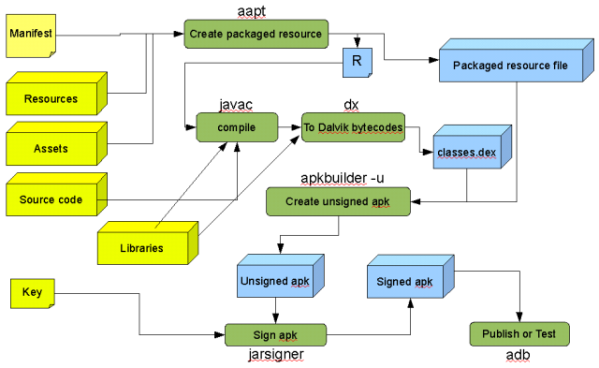
Below is one of the many apk build processes:
Build process
Build process
The good thing about building manually your apk is that you don’t have to name your resources directory to res, you can name it anything you want.
You can find ant scripts in: <SDK_HOME>\platforms\android-1.5\templates\android-rules.xml
Step 1: Generate Resource java code and packaged Resources
aapt  package -f -M ${manifest.file} -F ${packaged.resource.file} -I ${path.to.android-jar.library} -S ${android-resource-directory} [-m -J ${folder.to.output.the.R.java}]

Step 2: Compile java source codes + R.java
use javac

Step 3: Convert classes to Dalvik bytecodes
use dx.bat
dx.bat  –dex  –output=${output.dex.file}  ${compiled.classes.directory}  ${jar files..}

Step 4: Create unsigned APK
use apkbuilder

apkbuilder  ${output.apk.file} -u -z  ${packagedresource.file} -f  ${dex.file}

or

apkbuilder  ${output.apk.file} -u -z  ${packagedresource.file} -f  ${dex.file}  -rf  ${source.dir}  -rj  ${libraries.dir}
-rf = resources required for compiled source files?
-rj = resources required for jar files

Step 6: Generate a key
use keytool

Step 7: Sign APK
use jarsigner

jarsigner  -keystore ${keystore} -storepass  ${keystore.password} -keypass ${keypass} -signedjar ${signed.apkfile} ${unsigned.apkfile} ${keyalias}
Step 8: Publish
use adb
adb -d install -r ${signed.apk}

Inspecting your APK file:
aapt list -v latest.apk
Open questions:
1. Can you include more than one dex file in the apk?
2. Can you have dex file named other than classes.dex in the apk?
3. Does an apk have to have a packaged resource?

Note: If upon installing your app using adb you see this error code FAILED_INSTALL_DEXOPT then most likely that either you don’t have classes.dex or you don’t have a packaged resource in the apk

2012년 2월 27일 월요일

안드로이드 apk 디컴파일 (dex2jar)

출처: http://blog.naver.com/hks9999?Redirect=Log&logNo=30103399449

안드로이드 디컴파일 하는 방법에 대해 정리

디컴파일 시도하면서 시행착오를 많이 겪어 정리를 해둔다.

준비사항

1. Java SDK
  - 아래의 툴들을 실행하는데 필요한 JRE 및 JDK
  - 다운로드 : http://www.oracle.com/technetwork/java/javase/downloads/index.html

2. Dex2Jar( Dex -> Jar)
  - 설명 : (.Dex)파일을 Class압축파일(.Jar)로 변환
  - 다운로드 : http://code.google.com/p/dex2jar/downloads/list
  - 최신버젼 : dex2jar-0.0.7.8-SNAPSHOT.zip
  - 필요환경 : JRE(Java Runtime Enviroment) 필요

3. Jad(Java Decompiler)
  - Class 파일 -> 자바소스로 디컴파일
  - 다운로드 : http://www.varaneckas.com/jad
  - 최신버젼 : jad158g

디컴파일 과정 설명

1. 먼저 풀고자 하는 .apk파일을 압축을 해제

2. dex2jar툴을 사용하여 classes.dex파일을 class파일로 변환한다.


아래와 같이 classes.dex.dex2jar.jar 생성된 것을 확인할 수 있다.


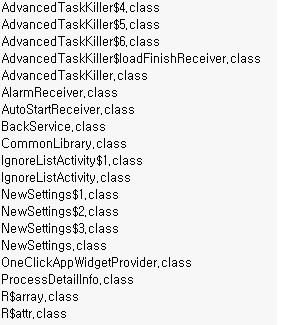
해당 파일을 압축을 해제하면 하위 디렉토리가 생기면서 class 파일이 생긴것을 확인할 수 있다.


해당 폴더로 이동하여

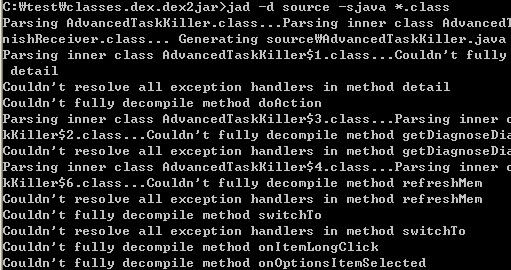
jad -d source -sjava *.class 와 같이 입력을 하자.
 옵션설명
  -d 는 source 디렉토리에 생성
  -s 는 디컴파일 되는 소스의 확장자를 java
   *.class 대상으로


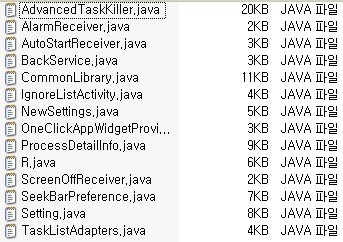
디컴파일이 진행이 되면 아래와 같이 소스 확인이 가능하다.


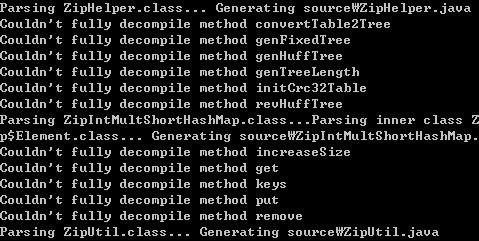
그런데 아까 디컴파일 도중에 난 에러는 무엇을 의미하는 것일까?


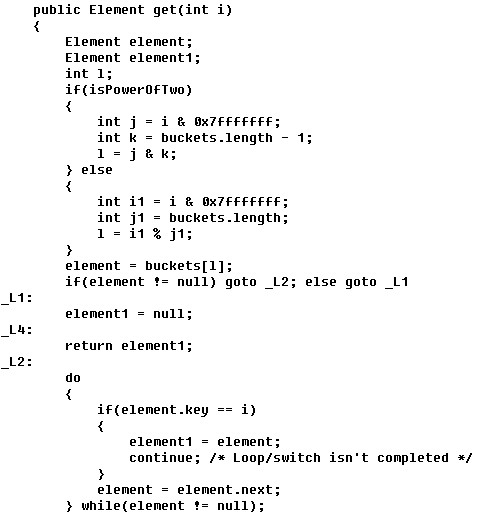
ZipIntMultShortHashMap.class 파일중 Get함수에서 완전히 디컴파일하지 못했다라고 오류메시지가 나온다.
소스를 한번 보자.


위 그림처럼 _L1, _L4와 같은 레이블은 정상적인 자바 프로그래밍이면 나오지 않아야 하는데, 변환과정에서 완전하게는 디컴파일 하지 못하여 저렇게 표시는 것으로 보인다.
로직상으로는 동일할 것 같다.

그리고 .dex파일을 .jar(class파일들)로 변경해주는 다른 방법이 있는데
dexdump.exe와 undx.jar라는 파일을 이용하여 변경해주는 방법이다.

java -DASDKLoc={dexdump.exe경로} -jar undx.jar classes.dex

많은 수의 안드로이드 APK파일을 디컴파일 해본것은 아니지만,

성능은 dex2jar > undx.jar보단 낳다고 생각된다.

< 장점 >
undx.jar 변경시 오류나는 것들을 dex2jar는 문제없이 디컴파일된다.
변경속도가 빠름
사용자가 보다 해석하기 쉽게 디컴파일 됨

암튼 dex2jar 툴을 모르고 undx.jar로 디컴파일 해보다 많은 시행착오를 겪었기에 정리를 해본다.

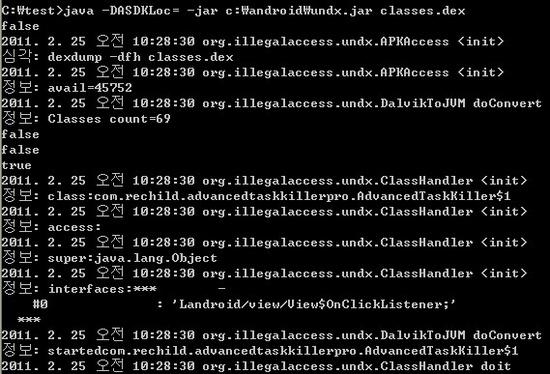
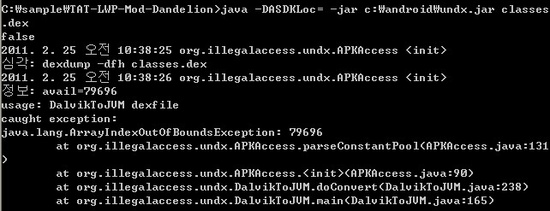
1) 오류화면 #1 [ Dexdump.exe가 정상적으로 실행되지 않아 생기는 문제 ]


dexdump.exe파일이 있는 위치를 지정을 해주는 것인데 DASDKLOC=c:\디렉토리명 으로 해도 제대로 인식이 되질 않는다.
그래서 dexdump.exe와 mgwz.dll를 set path=%path% 경로를 추가하던지, 동일디렉토리에 놓고
java -DASDKLoc= -jar c:\android\undx.jar classes.dex와 같이 수행하면 잘 된다.


그런데 undex.jar를 이용한 디컴파일은 되는 파일이 있고 되지 않는 파일이 있다.

이거 뭐 어떻게 할수도 없고...
그래서 dex2jar 툴을 추천한다.

Extending AIR for Android

http://www.jamesward.com/2011/05/11/extending-air-for-android/


Extending AIR for Android

*** The following is totally unsupported by Adobe ***
*** UPDATE: Adobe has officially added native extensions to AIR. I highly recommend you use that approach instead of mine. ***
Adobe AIR provides a consistent platform for desktop and mobile apps. While consistency is very important there are times when developers need to extend beyond the common APIs. This article will walk you through how to integrate AIR for Android applications with other native APIs and functionality in the Android SDK. It covers three common use cases for native extensibility: System Notifications, Widgets, and Application Licensing.
If you’d like to follow along you will need the following prerequisites:
Before getting started, a little background will help. Android applications are distributed as APK files. An APK file contains the Dalvik executable (dex), which will run on an Android device inside the Dalvik VM. The Android SDK compiles a Java-like language to dex.
AIR for Android applications are also distributed as APK files. Inside of these APK files is a small bit of dex that bootstraps the AIR for Android runtime, which then loads and runs the SWF file that is also inside of the APK. The actual dex class that bootstraps the AIR application is dynamically generated by the adt tool in the AIR SDK. The class is named AppEntry and its package name depends on the AIR application ID, but it always begins with “air”. The AppEntry class checks for the existence of the AIR runtime and then launches the AIR application. The Android descriptor file in an AIR APK specifies that the main application class is the AppEntry class.
To extend AIR for Android applications to include native APIs and Android SDK functionality, you start by creating a SWF file using Flex and then copy that SWF file, the dex classes for AIR for Android, and the required resources into a standard Android project. By using the original AppEntry class you can still bootstrap the AIR application in the Android project but you can extend that class to gain a startup hook.
  1. To get started, download a package with the required dependencies for extending AIR for Android:
    http://www.jamesward.com/downloads/extending_air_for_android-flex_4_5-air_2_6-v_1.zip
  2. Next, create a regular Android project in Eclipse (do not create an Activity yet):
  3. Copy all of the files from the zip file you downloaded into the root directory of the newly created Android project. You will need to overwrite the existing files and update the launch configuration (if Eclipse asks you to).
  4. Delete the “res/layout” directory.
  5. Add the airbootstrap.jar file to the project’s build path. You can do that by right-clicking on the file, then select Build Path and then Add to Build Path.
  6. Verify that the project runs. You should see “hello, world” on your Android device. If so, then the AIR application is properly being bootstrapped and the Flex application in assets/app.swf is correctly being run. At this point if you do not need any custom startup hooks then you can simply replace the assets/app.swf file with your own SWF file (but it must be named app.swf). If you do need a custom startup hook then simply create a new Java class named “MainApp” that extends the air.app.AppEntry class.
  7. Override the onCreate() method and add your own startup logic before super.onCreate() is called (which loads the AIR app). Here is an example:
    package com.jamesward;
     
    import air.app.AppEntry;
    import android.os.Bundle;
     
    public class MainApp extends AppEntry {
     
     @Override
     public void onCreate(Bundle arg0) {
      System.out.println("test test");
      super.onCreate(arg0);
     }
    }
  8. Open the AndroidManifest.xml descriptor file and tell it to use the new MainApp class instead of the original AppEntry class. First change the package to be the same as your MainApp’s package:
    <manifest package="com.jamesward" android:versionCode="1000000" android:versionName="1.0.0"
      xmlns:android="http://schemas.android.com/apk/res/android">
    Also update the activity to use the MainApp class (make sure you have the period before the class name):
    <activity android:name=".MainApp"
    You can also add any other permissions or settings you might need in the AndroidManifest.xml file.
  9. Save the changes and, when Eclipse prompts you, update the launch configuration.
  10. Run the application and you should again see “hello, world”. This time, however, in LogCat (command line tool or Eclipse view) you should see the “test test” output. Now that you have a startup hook, you can do some fun stuff!
System Notifications and Services
AIR for Android applications don’t yet have an API to do Android system notifications. But you can add system notifications to your AIR for Android application through a startup hook. In order for the AIR application to communicate with the native Android APIs you must provide a bridge for the communication. The simplest way to create that bridge is using a network socket. The Android application can listen for data on the socket and then read that data and determine if it needs to display a system notification. Then the AIR application can connect to the socket and send the necessary data. This is a pretty straightforward example but some security (for instance a key exchange) should be implemented to insure that malicious apps don’t discover and abuse the socket. Also some logic to determine which socket should be used would likely be necessary.
  1. Inside the application section add a new Android Service:
  2. <service android:enabled="true" android:name="TestService" />
  3. Since this example uses a Socket you will also need to add the INTERNET permission:
  4. <uses-permission android:name="android.permission.INTERNET"/>
  5. You might also want to enable the phone to vibrate when there is a new notification. If so add that permission as well:
    <uses-permission android:name="android.permission.VIBRATE"/>
  6. Save your changes to AndroidManifest.xml.
  7. Next, create the background Java Service class, called TestService. This service will listen on a socket and when necessary, display an Android Notification:
    package com.jamesward;
     
    import java.io.BufferedInputStream;
    import java.io.DataInputStream;
    import java.io.IOException;
    import java.net.ServerSocket;
    import java.net.Socket;
     
    import android.app.Notification;
    import android.app.NotificationManager;
    import android.app.PendingIntent;
    import android.app.Service;
    import android.content.Context;
    import android.content.Intent;
    import android.os.IBinder;
    import android.os.Looper;
    import android.util.Log;
     
    public class TestService extends Service
    {
      private boolean stopped=false;
      private Thread serverThread;
      private ServerSocket ss;
     
      @Override
      public IBinder onBind(Intent intent)
      {
        return null;
      }
     
      @Override
      public void onCreate()
      {
        super.onCreate();
     
        Log.d(getClass().getSimpleName(), "onCreate");
     
          serverThread = new Thread(new Runnable() {
     
            public void run()
            {
                    try
                    {
                            Looper.prepare();
                            ss = new ServerSocket(12345);
                            ss.setReuseAddress(true);
                            ss.setPerformancePreferences(100, 100, 1);
                            while (!stopped)
                            {
                                    Socket accept = ss.accept();
                                    accept.setPerformancePreferences(10, 100, 1);
                                    accept.setKeepAlive(true);
     
                                    DataInputStream _in = null;
                                    try
                                    {
                                            _in = new DataInputStream(new BufferedInputStream(accept.getInputStream(),1024));
                                    }
                                    catch (IOException e2)
                                    {
                                      e2.printStackTrace();
                                    }
     
                                    int method =_in.readInt();
     
                                    switch (method)
                                    {
                                      // notification
                                      case 1:
                                            doNotification(_in);
                                            break;
                                    }
                            }
                    }
                    catch (Throwable e)
                    {
                            e.printStackTrace();
                            Log.e(getClass().getSimpleName(), "Error in Listener",e);
                    }
     
                    try
                    {
                      ss.close();
                    }
                    catch (IOException e)
                    {
                      Log.e(getClass().getSimpleName(), "keep it simple");
                    }
            }
     
            },"Server thread");
          serverThread.start();
     
      }
     
      private void doNotification(DataInputStream in) throws IOException {
        String id = in.readUTF();
        displayNotification(id);
      }
     
      @Override
      public void onDestroy() {
              stopped=true;
              try {
                      ss.close();
              } catch (IOException e) {}
              serverThread.interrupt();
              try {
                      serverThread.join();
              } catch (InterruptedException e) {}
      }
     
      public void displayNotification(String notificationString)
      {
        int icon = R.drawable.mp_warning_32x32_n;
        CharSequence tickerText = notificationString;
        long when = System.currentTimeMillis();
        Context context = getApplicationContext();
        CharSequence contentTitle = notificationString;
        CharSequence contentText = "Hello World!";
     
        Intent notificationIntent = new Intent(this, MainApp.class);
        PendingIntent contentIntent = PendingIntent.getActivity(this, 0, notificationIntent, 0);
     
        Notification notification = new Notification(icon, tickerText, when);
        notification.vibrate = new long[] {0,100,200,300};
     
        notification.setLatestEventInfo(context, contentTitle, contentText, contentIntent);
     
        String ns = Context.NOTIFICATION_SERVICE;
        NotificationManager mNotificationManager = (NotificationManager) getSystemService(ns);
     
        mNotificationManager.notify(1, notification);
      }
     
    }
    This service listens on port 12345. When it receives some data it checks if the first “int” sent is “1”. If so, it then creates a new notification using the next piece of data (a string) that is received over the socket.
  8. Modify the MainApp Java class to start the service when the onCreate() method is called:
    @Override
     public void onCreate(Bundle savedInstanceState)
     {
      try
      {
       Intent srv = new Intent(this, TestService.class);
       startService(srv);
      }
      catch (Exception e)
      {
       // service could not be started
      }
     
      super.onCreate(savedInstanceState);
     }
    That is all you need to do in the Android application.
  9. Next, create a Flex application that will connect to the socket and send the right data. Here is some sample code for my Notifier.mxml class, which I used to test the Android service:
    <?xml version="1.0" encoding="utf-8"?>
    <s:Application xmlns:fx="http://ns.adobe.com/mxml/2009" 
                           xmlns:s="library://ns.adobe.com/flex/spark">
     
      <fx:Style>
        @namespace s "library://ns.adobe.com/flex/spark";
     
        global {
          fontSize: 32;      
        }
      </fx:Style>
     
      <s:layout>
        <s:VerticalLayout horizontalAlign="center" paddingTop="20"/>
      </s:layout>
     
      <s:TextInput id="t" text="test test"/>
     
      <s:Button label="create notification">
        <s:click>
          <![CDATA[
            var s:Socket = new Socket();
            s.connect("localhost", 12345);
            s.addEventListener(Event.CONNECT, function(event:Event):void {
              trace('connected!');
              (event.currentTarget as Socket).writeInt(1);
              (event.currentTarget as Socket).writeUTF(t.text);
              (event.currentTarget as Socket).flush();
              (event.currentTarget as Socket).close();
            });
            s.addEventListener(IOErrorEvent.IO_ERROR, function(event:IOErrorEvent):void {
              trace('error! ' + event.errorID);
            });
            s.addEventListener(ProgressEvent.SOCKET_DATA, function(event:ProgressEvent):void {
              trace('progress ');
            });
          ]]>
        </s:click>
      </s:Button>
     
    </s:Application>
    As you can see there is just a TextInput control that allows the user to enter some text. Then when the user clicks the Button the AIR for Android application connects to a local socket on port 12345, writes an int with the value of 1, writes the string that the user typed into the TextInput control, and finally flushes and closes the connection. This causes the notification to be displayed.
  10. Now simply compile the Flex app and overwrite the assets/app.swf file with the new Flex application. Check out a video demonstration of this code.
Widgets
Widgets in Android are the mini apps that can be displayed on the home screen of the device. There is a fairly limited amount of things that can be displayed in Widgets. So unfortunately Widgets can’t be built with AIR for Android. However a custom application Widget can be packaged with an AIR for Android application. To add a Widget to an AIR for Android application you can use the default AppEntry class instead of wrapping it with another class (MainApp in my example). (It doesn’t, however, do any harm to keep the MainApp class there.) To add a Widget simply add its definition to the AndroidManifest.xml file, create the Widget with Java, and create a corresponding layout resource.
  1. First define the Widget in the application section of the AndroidManifest.xml file:
    <receiver android:name=".AndroidWidget" android:label="app">
        <intent-filter>
            <action android:name="android.appwidget.action.APPWIDGET_UPDATE" />
        </intent-filter>
        <meta-data android:name="android.appwidget.provider" android:resource="@xml/airandroidwidget" />
    </receiver>
  2. You need an XML resource that provides metadata about the widget. Simply create a new file named airandroidwidget.xml in a new res/xml directory with the following contents:
    <?xml version="1.0" encoding="utf-8"?>
    <appwidget-provider xmlns:android="http://schemas.android.com/apk/res/android"
        android:minWidth="294dp"
        android:minHeight="72dp"
        android:updatePeriodMillis="86400000"
        android:initialLayout="@layout/main">
    </appwidget-provider>
    This tells the widget to use the main layout resource as the initial layout for the widget.
  3. Create a res/layout/main.xml file that contains a simple text display:
    <?xml version="1.0" encoding="utf-8"?>
    <LinearLayout xmlns:android="http://schemas.android.com/apk/res/android"
        android:id="@+id/widget"
        android:orientation="vertical"
        android:layout_width="fill_parent"
        android:layout_height="fill_parent"
        android:background="#ffffffff"
        >
    <TextView  
        android:layout_width="fill_parent" 
        android:layout_height="wrap_content" 
        android:text="hello"
        />
    </LinearLayout>
    Next, you’ll need to create the AppWidgetProvider class specified in the AndroidManifest.xml file.
  4. Create a new Java class named AndroidWidget with the following contents:
    package com.jamesward;
     
    import android.app.PendingIntent;
    import android.appwidget.AppWidgetManager;
    import android.appwidget.AppWidgetProvider;
    import android.content.Context;
    import android.content.Intent;
    import android.widget.RemoteViews;
    import com.jamesward.MainApp;
     
    public class AndroidWidget extends AppWidgetProvider
    {
     
        public void onUpdate(Context context, AppWidgetManager appWidgetManager, int[] appWidgetIds)
        {
            final int N = appWidgetIds.length;
     
            // Perform this loop procedure for each App Widget that belongs to this provider
            for (int i=0; i<N; i++)
            {
                int appWidgetId = appWidgetIds[i];
                Intent intent = new Intent(context, MainApp.class);
                intent.setAction(Intent.ACTION_MAIN);
                PendingIntent pendingIntent = PendingIntent.getActivity(context, 0, intent, 0);
                RemoteViews views = new RemoteViews(context.getPackageName(), R.layout.main);
                views.setOnClickPendingIntent(R.id.widget, pendingIntent);
                appWidgetManager.updateAppWidget(appWidgetId, views);
            }
        }
    }
    This class will display the Widget when necessary and register a click handler that will open the MainApp application when the user taps on the Widget.
  5. Run the application to verify that it works.
  6. Now you can add the widget to the home screen by holding down on the home screen and following the Widget wizard.
  7. Verify that tapping the widget launches the AIR application.
Application Licensing
Android provides APIs to help you enforce licensing policies for non-free apps in the Android Market. You might want to go read up on Android Licensing before you give this one a try.
To add Application Licensing to you AIR for Android application you first need to follow the steps outlined in the Android documentation. The broad steps are as follows:
  1. Set up an Android Market publisher account
  2. Install the Market Licensing Package in the Android SDK
  3. Create a new LVL Android Library Project in Eclipse
  4. Add a Library reference in the Android project to the LVL Android Library
  5. Add the CHECK_LICENSE permission to your Android project’s manifest file:
    <uses-permission android:name="com.android.vending.CHECK_LICENSE" />
After completing these set up steps, you are ready to update the MainApp Java class to handle validating the license:
package com.jamesward;
 
import com.android.vending.licensing.AESObfuscator;
import com.android.vending.licensing.LicenseChecker;
import com.android.vending.licensing.LicenseCheckerCallback;
import com.android.vending.licensing.ServerManagedPolicy;
 
import air.Foo.AppEntry;
import android.os.Bundle;
import android.os.Handler;
import android.provider.Settings.Secure;
 
public class MainApp extends AppEntry {
 
    private static final String BASE64_PUBLIC_KEY = "REPLACE WITH KEY FROM ANDROID MARKET PROFILE";
 
    // Generate your own 20 random bytes, and put them here.
    private static final byte[] SALT = new byte[] {
        -45, 12, 72, -31, -8, -122, 98, -24, 86, 47, -65, -47, 33, -99, -55, -64, -114, 39, -71, 47
    };
 
    private LicenseCheckerCallback mLicenseCheckerCallback;
    private LicenseChecker mChecker;
    private Handler mHandler;
 
    @Override
    public void onCreate(Bundle savedInstanceState) {
        super.onCreate(savedInstanceState);
        mHandler = new Handler();
        String deviceId = Secure.getString(getContentResolver(), Secure.ANDROID_ID);
        mLicenseCheckerCallback = new MyLicenseCheckerCallback();
        mChecker = new LicenseChecker(
            this, new ServerManagedPolicy(this,
                new AESObfuscator(SALT, getPackageName(), deviceId)),
            BASE64_PUBLIC_KEY);
        mChecker.checkAccess(mLicenseCheckerCallback);
    }
 
    private void displayFault() {
        mHandler.post(new Runnable() {
            public void run() {
                // Cover the screen with a messaging indicating there was a licensing problem
                setContentView(R.layout.main);
            }
        });
    }
 
    private class MyLicenseCheckerCallback implements LicenseCheckerCallback {
        public void allow() {
            if (isFinishing()) {
                // Don't update UI if Activity is finishing.
                return;
            }
            // Should allow user access.
        }
 
        public void dontAllow() {
            if (isFinishing()) {
                // Don't update UI if Activity is finishing.
                return;
            }
            displayFault();
        }
 
        public void applicationError(ApplicationErrorCode errorCode) {
            if (isFinishing()) {
                // Don't update UI if Activity is finishing.
                return;
            }
        }
    }
 
    @Override
    protected void onDestroy() {
        super.onDestroy();
        mChecker.onDestroy();
    }
}
Also add the following to a new res/layout/main.xml file in order to display an error when the license is denied:
<?xml version="1.0" encoding="utf-8"?>
<LinearLayout xmlns:android="http://schemas.android.com/apk/res/android"
    android:orientation="vertical"
    android:layout_width="fill_parent"
    android:layout_height="fill_parent"
    >
 
  <TextView  
    android:layout_width="fill_parent" 
    android:layout_height="wrap_content" 
    android:text="@string/license_problem"
    />
 
</LinearLayout>
The text to display uses a string resource named “license_problem”, which must be added to the res/values/strings.xml file:
<string name="license_problem">THERE WAS A PROBLEM LICENSING YOUR APPLICATION!</string>
When the application runs it will check for a valid license. If the license comes back as valid then the AIR application will start and run as usual. However, if there is an invalid license then the application will set the ContentView to the R.layout.main resource, which displays the error message defined in the “license_problem” resource. To simulate different responses you can change the “Test Response” in your Android Market profile.
The Gory Details
I’ve wrapped up a generated AppEntry class and its resources to make the process of extending AIR for Android fairly easy. If you are interested in seeing how that is done, I’ve posted all of the source code on github.
Here is an overview of the procedure:
  1. Use the AIR SDK to create an AIR for Android APK file.
  2. Use the dex2jar utility to convert the AppEntry dex classes into a JAR file.
  3. Pull the resource classes out of the JAR file so that they don’t conflict with the new resources.
  4. Use apktool to extract the original resources out of the AIR for Android APK file.
  5. Create a single ZIP file containing the airbootstap.jar file, resources, AndroidManifest.xml file, and assets.
Now you can simply copy and paste those dependencies into your Android project.
Conclusion
Hopefully this article has helped you to better understand how you can extend AIR for Android applications with Android APIs. There are still a number of areas where this method can be improved. For instance, I am currently working with the Merapi Project developers to get Merapi working with my method of extending AIR for Android. That will provide a better bridging technique for communicating between the AIR application and Android APIs. So stay tuned for more information about that. And let me know if you have any questions!
This entry was posted in Adobe AIR, Android, Flex, Mobile. Bookmark the permalink. Post a comment or leave a trackback: Trackback URL.

Android, Java, Dalvik VM 에 대한 이해

아래 글들을 읽어보시면 Android에서 동작하는 Java VM을 대신하는 Dalvik VM에 대해서 이해가 쉬울거 같습니다.
Dalvik Virtual Machine : http://blog.vizpei.kr/63464875
구글의 Android 플랫폼, 그리고 Dalvik VM : http://sink772.egloos.com/3490667
간단하게 정리하자면
Android에서 앱이 돌아갈 때 Java VM이 아니라 Dalvik VM이 동작합니다.
우리가 만들때 코드는 Java 지만 실제로 컴파일된 파일은 .dex(Dalvik Executive File) 로 나옵니다.
이 dex 파일을 실행시켜주는게 Davlik VM 인것이죠.
이 이야기가 중요한 이유는
현재 Adobe AIR 3.0 Beta 2 에 나온 Native Extension은 Java VM에서는 돌아가지만 (즉, 데스크탑에서는 돌아가지만)
Dalvik VM에서는 아직 돌아가지 않습니다. (안드로이드 OS에선 안된다는 얘기죠)
Adobe AIR 3.0 Beta 다음 버전이나 정식버전이 나와야 제대로 돌아갈 거 같습니다.

Native Extension 개발 리스크 정리

생각 날 때마다 업데이트 할께요.
1. AppEntry 접근/상속 불가.
 - onPause/Resume, onTouchEvent onActivityResult 등 상위 메소드를 사용할 수 없다. (다른 방법을 강구해야함)
 - startActivity 시에 Class를 던져줘야하는데 AppEntry 클래스가 은닉되어 있기 때문에 Class.forName() 으로 사용해야한다.
2. Resource 컨트롤 어려움
 - String 사용이 무조건 strings.xml 에 정의되어 layout을 사용해야하기 때문에 외부 프레임웍의 경우 일일이 리소스를 풀어서 재작업해야한다.
 - 리소스를 풀어서 재작업할 경우 R.drawable 처럼 Resource 클래스의 id가 변경되기 때문에 getResourceByName 식으로 사용되어야 한다.
 - *.apk/res 폴더는 엎어쓸 수 있으나 그 외에 *.apk/xml 처럼 최상위 루트 폴더를 생성할 수 없기 때문에 이를 사용하는 외부 프레임웍은 디컴파일로 수정해야한다.
3. 디버깅이 어려움
 - apk 패키징 후 테스트해야하기 때문에 App 내부에서 에러가 난 경우 LogCat의 Error 외에는 확인할 방법이 없다.

2012년 2월 20일 월요일

MySQL 쓰면서 하지 말아야 할 것 17가지

http://www.slideshare.net/techdude/how-to-kill-mysql-performance

작게 생각하기
- 조만간 규모가 커질거라면 MySQL ecosystem을 봐야된다.
- 그리고 캐싱 빡시게 안 하는 메이저 웹사이트는 없다.
- develooper.com의 Hansen PT랑 Ilia 튜토리얼 볼 것
- 처음부터 확장 가능하게 아키텍처 잘 쪼개놔야된다.
- 복제랑 파티셔닝 어떻게 할지 미리 계획 세워놔라.
- 파일 기반 세션 좀 쓰지마 -_-
- 그렇다고 너무 쓸데없이 크게 생각하지도 말 것
- 특히 성능하고 확장성 구분 못 하면 난감함

EXPLAIN 안 써보기
- SELECT 앞에 EXPLAIN 이라고 붙이기만 하면 되는 것을 (..)
- 실행 계획 확인
- 타입 컬럼에 index 써있는거랑 Extra 컬럼에 index 써있는거랑 "매우 큰" 차이 있음
 * 타입에 있으면 Full 인덱스 스캔 (안 좋다.)
 * Extra 컬럼에 있으면 Covering 인덱스 찾았다는 의미임 (좋다!)
- 5.0 이후부터는 index_merge 최적화도 한다.

잘못된 데이터 타입 선택
- 한 메모리 블럭 단위에 인덱스 레코드가 많이 들어갈수록 쿼리가 빨리 실행될 것이다. (중요)
- 아.. 정규화 좀 해 -_-... (이거 정말 충격과 공포인 듯)
- 가장 작은 데이터 타입을 써.. (진짜 BIGINT가 필요하냐고..)
- 인덱스 걸리는 필드는 정말 최소한으로 데이터 크기를 써야된다고.
- IP는 INT UNSIGNED로 저장해!! (아주 공감)
 * 이럴 때 쓰라고 INET_ATON 함수가 아예 내장되어 있음.

PHP에서 pconnect 쓰는 짓
- 아파치에서 좀비 프로세스라도 생기면 그 커넥션은 그냥 증발하는거야..
- 어차피 MySQL 접속 속도는 Oracle이나 PostgreSQL 보다 10~100배 빠르다고.

너무 과도한 DB 추상화 계층을 두는 것
- 어디 포팅 열심히 할 거 아니면 추상화 계층 쓰지마 (ADODB, MDB2, PearDB 등)
- scale out 가능한걸 쓰라고.

스토리지 엔진 이해 못 하는 것
- 단일 엔진만으로 전체 아키텍처를 결정했다면 대부분 최적이 아님
- 엔진 별 장단점을 공부할 것
- ARCHIVE : zlib으로 압축해주고 UPDATE 안 되고 로그 Bulk Insert에 유용함.
- MEMORY : 서버 재시작하면 증발. 인덱스가 HASH나 BTREE로 가능함. 임시, 요약 데이터에 사용.
 * 주간 top X 테이블 같은 것.
 * 하여튼 메모리에 박아넣고 싶은 데이터 있으면..

인덱스 레이아웃 이해 못 하는 것
- 제대로 인덱스랑 스토리지 엔진 선택하려면 공부 좀 해
- 엔진은 데이터와 인덱스 레코드를 메모리나 디스크에 레이아웃하는 걸 구현한 것
- clustered 구성은 데이터를 PK 순서에 따라 저장함.
- non-clustered 구성은 인덱스만 순서대로 저장하고 데이터는 순서 가정하지 않음.
- clustered에서는 인덱스만 타면 추가적인 조회 없이 바로 데이터 가져오는 것임.
- 그래서 clustered PK는 작은 놈으로 할 필요가 있다는거
 * 다른 인덱스는 각 레코드마다 PK를 앞에 더 붙이게 되니까.
 * PK 지정 안 하면 아무렇게나 해버림

쿼리 캐시 이해 못 하는 것
- 어플리케이션 read/write 비율은 알고 있어야지
- 쿼리 캐시 설계는 CPU 사용과 읽기 성능 간의 타협
- 쿼리 캐시 크기를 늘린다고 읽기 성능이 좋아지는게 아님. heavy read라도 마찬가지.
- 과도한 CPU 사용을 막기 위해 무효화 할 때는 캐시 항목들을 뭉텅이로 날려버림
- 한마디로 SELECT가 참조하는 테이블 데이터 하나라도 변경되면 그 테이블 캐시는 다 날라간다는 얘기임
- 수직 테이블 파티셔닝으로 처방
 * Product와 ProductCount를 쪼갠다든지..
 * 자주 변하는 것과 변하지 않는 것을 쪼개는게 중요하다 이 말임.

Stored Procedure를 쓰는 것
- 무조건 쓰면 안 된다는게 아니고..
- 컴파일 할 때 무슨 일이 일어나는지 이해 못 하고 쓰면 재앙이 된다 이 말.
- 다른 RDBMS랑 다르게 connection thread에서 실행 계획이 세워짐.
- 이게 뭔 얘기냐 하면 데이터 한 번 가져오고 연결 끊으면 그냥 CPU 낭비 (7~8% 정도)하는 꼴이라는 것.
- 웬만하면 Prepared 구문과 Dynamic SQL을 써라.. 아래 경우를 제외하고
 * ETL 타입 프로시저
 * 아주아주 복잡하지만 자주 실행되지는 않는 것
 * 한 번 요청할 때마다 여러번 실행되는 간단한 것 (연결한 상태로 여러번 써야 된다니까)

인덱스 컬럼에 함수 쓰는 것
- 함수에 인덱스 컬럼 넣어 호출하면 당연히 인덱스 못 탄다
- 함수를 먼저 계산해서 상수로 만든 다음에 = 로 연결해야 인덱스 탈 수 있다.
 * 여기 실행 계획 보면 LIKE도 range type 인덱스 타는 것 보임

인덱스 빼먹거나 쓸모없는 인덱스 만들어 놓는 것
- 인덱스 분포도(selectivity)가 허접하면 안 쓴다.
- S = d/n
 * d = 서로 다른 값의 수 (# of distinct values)
 * n = 테이블의 전체 레코드 수
- 쓸모없는 인덱스는 INSERT/UPDATE/DELETE를 느리게 할 뿐..
- FK는 무조건 인덱스 걸어라. (물론 FK 제약 걸면 인덱스 자동으로 생긴다.)
- WHERE나 GROUP BY 표현식에서 쓰이는 컬럼은 인덱스 추가를 고려할 것
- covering index 사용을 고려할 것
- 인덱스 컬럼 순서에 유의할 것!

join 안 쓰는 짓
- 서브쿼리는 join으로 재작성해라
- 커서 제거해라
- 좋은 Mysql 성능을 내려면 기본
- 집합 기반으로 생각해야지 루프 돌리는거 생각하면 안 된다.

Deep Scan 고려하지 않는 것
- 검색엔진 크러울러가 쓸고 지나갈 수 있다.
- 이 경우 계속해서 전체 집합을 정렬한 다음 LIMIT로 가져와야 하니 무진장 느려진다.
- 어떻게든 집합을 작게 줄인 다음 거기서 LIMIT 걸어 가져올 것

InnoDB 테이블에서 WHERE 조건절 없이 SELECT COUNT(*) 하는 짓
- InnoDB 테이블에서는 조건절 없이 COUNT(*) 하는게 느리다.
- 각 레코드의 transaction isolation을 유지하는 MVCC 구현이 복잡해서 그렇다는..
- 트리거 걸어서 메모리 스토리지 엔진 쓰는 테이블에 통계를 별도로 유지하면 된다.

프로파일링이나 벤치마킹 안 하는 것
- 프로파일링 : 병목 찾아내기
- 벤치마킹 : 시간에 따른 성능 변화 추이 평가, 부하 견딜 수 있는지 테스트
- 프로파일링 할 때는 실제 데이터를 옮겨와서 할 것
- 어디가 병목이냐~ Memory? Disk I/O? CPU? Network I/O? OS?
- 느린 쿼리 로그로 남기기
 * log_slow_queries=/path/to/log
 * log_queries_not_using_indexes
- 벤치마킹 시에는 다 고정시키고 변수 하나만 바꿔가면서 해야 함. (쿼리 캐시는 끌 것.)
- 도구를 써라~~
 * EXPLAIN
 * SHOW PROFILE
 * MyTop/innotop
 * mysqlslap
 * MyBench
 * ApacheBench (ab)
 * super-smack
 * SysBench
 * JMeter/Ant
 * Slow Query Log

AUTO_INCREMENT 안 쓰는 것
- PK를 AUTO_INCREMENT로 쓰는건 무진장 최적화 되어 있음
 * 고속 병행 INSERT 가능
  * 잠금 안 걸리고 읽으면서 계속 할 수 있다는!
- 새 레코드를 근처에 놓음으로써 디스크와 페이지 단편화를 줄임
- 메모리와 디스크에 핫 스팟을 생성하고 스와핑을 줄임

ON DUPLICATE KEY UPDATE를 안 쓰는 것
- 레코드가 있으면 업데이트하고 없으면 인서트하고 이런 코드 필요없다!! 다 날려버려라!!
- 서버에 불필요하게 왔다갔다 할 필요가 없어짐
- 5-6% 정도 빠름
- 데이터 입력이 많다면 더 커질 수 있음

하지 말아야 할 것 총정리
  1. Thinking too small
  2. Not using EXPLAIN
  3. Choosing the wrong data types
  4. Using persistent connections in PHP
  5. Using a heavy DB abstraction layer
  6. Not understanding storage engines
  7. Not understanding index layouts
  8. Not understanding how the query cache works
  9. Using stored procedures improperly
  10. Operating on an indexed column with a function
  11. Having missing or useless indexes
  12. Not being a join-fu master
  13. Not accounting for deep scans
  14. Doing SELECT COUNT(*) without WHERE on an InnoDB table
  15. Not profiling or benchmarking
  16. Not using AUTO_INCREMENT
  17. Not using ON DUPLICATE KEY UPDATEK
2012년 2월 9일 목요일

정규식 구문

http://msdn.microsoft.com/ko-kr/library/ae5bf541%28d=printer%29.aspx


정규식 구문


정규식은 텍스트 본문을 검색할 때 일치하는 것으로 간주할 하나 이상의 문자열을 표현합니다. 식은 문자 패턴을 검색되는 문자열과 비교하기 위한 템플릿으로 사용됩니다.
정규식은 일반 문자(예: a-z 문자)와 메타문자로 알려진 특수 문자로 구성됩니다.
다음 표에서는 정규식에 사용되는 단일 문자로 된 메타문자와 그 동작을 설명합니다.
참고 참고
이러한 특수 문자 중 하나를 찾으려면 먼저 문자를 이스케이프해야 합니다. 즉, 해당 문자 앞에 백슬래시 문자(\)를 추가합니다. 예를 들어 리터럴 문자 "+"를 검색하려면 "\+" 식을 사용합니다.
메타문자 동작 예제
* 앞의 문자나 하위 식을 0개 이상 찾습니다.
{0,}와 같습니다.
zo*는 "z"와 "zoo"를 찾습니다.
+ 앞의 문자나 하위 식을 1개 이상 찾습니다.
{1,}와 같습니다.
zo+는 "zo"와 "zoo"를 찾지만 "z"는 찾지 않습니다.
? 앞의 문자나 하위 식을 0개나 1개 찾습니다.
{0,1}과 같습니다.
?가 *, +, ?, {n}, {n,} 또는 {n,m} 등의 다른 수량자 바로 뒤에 오면 일치하는 패턴은 non-greedy입니다. non-greedy 패턴은 검색되는 문자열에서 가능한 한 적은 부분을 찾습니다. 기본 greedy 패턴은 검색되는 문자열에서 가능한 한 많은 부분을 찾습니다.
zo?는 "z"와 "zo"를 찾지만 "zoo"는 찾지 않습니다.
o+?는 "oooo"에 있는 한 개의 "o"를 찾으며, o+는 모든 "o"를 찾습니다.
do(es)?는 "do" 또는 "does"에 있는 "do"를 찾습니다.
^ 검색되는 문자열의 시작 부분에서 위치를 찾습니다. 플래그와 함께 m(여러 줄 검색) 문자를 포함하면 ^은 \n 또는 \r 다음의 위치도 찾습니다.
대괄호 식의 첫 번째 문자로 사용될 경우 ^은 해당 문자 집합을 부정합니다.
^\d{3}은 검색되는 문자열의 시작 부분에서 3개의 숫자를 찾습니다.
[^abc]는 a, b 및 c를 제외한 모든 문자를 찾습니다.
$ 검색되는 문자열의 끝 부분에서 위치를 찾습니다. 플래그와 함께 m(여러 줄 검색) 문자를 포함하면 ^은 \n 또는 \r 앞의 위치도 찾습니다. \d{3}$은 검색되는 문자열의 끝 부분에서 3개의 숫자를 찾습니다.
. 줄 바꿈 문자 \n을 제외한 모든 단일 문자를 찾습니다. \n을 비롯한 모든 문자를 찾으려면 [\s\S] 같은 패턴을 사용합니다. a.c는 "abc", "a1c" 및 "a-c"를 찾습니다.
[] 대괄호 식의 시작 및 끝 부분을 표시합니다. [1-4]는 "1", "2", "3" 또는 "4"를 찾습니다. [^aAeEiIoOuU]는 모음이 아닌 모든 문자를 찾습니다.
{} 수량자 식의 시작 및 끝 부분을 표시합니다. a{2,3}은 "aa" 및 "aaa"를 찾습니다.
() 하위 식의 시작 및 끝 부분을 표시합니다. 나중에 사용하기 위해 하위 식을 저장할 수도 있습니다. A(\d)는 "A0"부터 "A9"까지를 찾습니다. 숫자는 나중에 사용하기 위해 저장됩니다.
|둘 이상의 항목 사이에서 선택함을 나타냅니다. z|food는 "z" 또는 "food"를 찾습니다. (z|f)ood는 "zood" 또는 "food"를 찾습니다.
/ JScript에서 리터럴 정규식 패턴의 시작과 끝을 나타냅니다. 두 번째 "/" 다음에 단일 문자 플래그를 추가하여 검색 동작을 지정할 수 있습니다. /abc/gi는 "abc"를 찾는 JScript 리터럴 정규식입니다. g(전역) 플래그는 해당 패턴이 나타나는 모든 항목을 찾도록 지정하고 i(대/소문자 무시) 플래그는 검색 시 대/소문자를 구분하지 않도록 지정합니다.
\ 다음에 오는 문자를 특수 문자, 리터럴, 역참조 또는 8진수 이스케이프로 표시합니다. \n은 줄 바꿈 문자를 찾습니다. \(는 "("를 찾습니다. \\는 "\"를 찾습니다.
대부분의 특수 문자는 대괄호 식 내에 사용될 경우 본래 의미를 잃고 일반 문자를 나타냅니다. 자세한 내용은 일치하는 문자 목록1에서 "대괄호 식의 문자"를 참조하십시오.
다음 표에서는 정규식에 사용되는 여러 문자로 된 메타문자와 그 동작을 설명합니다.
메타문자 동작 예제
\b 단어 경계, 즉 단어와 공백 사이의 위치를 찾습니다. er\b는 "never"의 "er"은 찾지만 "verb"의 "er"은 찾지 않습니다.
\B 단어 비경계를 찾습니다. er\B는 "verb"의 "er"은 찾지만 "never"의 "er"은 찾지 않습니다.
\d 숫자를 찾습니다.
[0-9]와 같습니다.
검색되는 문자열이 "12 345"일 때 \d{2}는 "12"와 "34"를 찾습니다. \d는 "1", "2", "3", "4" 또는 "5"를 찾습니다.
\D 숫자가 아닌 문자를 찾습니다.
[^0-9]와 같습니다.
\D+는 "abc123 def"의 "abc"와 " def"를 찾습니다.
\w A-Z, a-z, 0-9 및 밑줄 문자를 모두 찾습니다.
[A-Za-z0-9_]과 같습니다.
검색되는 문자열이 "The quick brown fox…"일 때 \w+는 "The", "quick", "brown" 및 "fox"를 찾습니다.
\W A-Z, a-z, 0-9 및 밑줄을 제외한 모든 문자를 찾습니다.
[^A-Za-z0-9_]과 같습니다.
검색되는 문자열이 "The quick brown fox…"일 때 \W+는 "…"와 모든 공백을 찾습니다.
[xyz] 문자 집합입니다. 지정한 문자 중 하나를 찾습니다. [abc]는 "plain"의 "a"를 찾습니다.
[^xyz] 부정 문자 집합입니다. 지정하지 않은 모든 문자를 찾습니다. [^abc]는 "plain"의 "p", "l", "i" 및 "n"을 찾습니다.
-a[z] 문자 범위입니다. 지정한 범위에서 문자를 찾습니다. [a-z]는 "a"부터 "z"까지의 범위에서 소문자 영문자를 찾습니다.
[^a-z] 부정 문자 범위입니다. 지정한 범위에 있지 않은 모든 문자를 찾습니다. [^a-z]는 "a"부터 "z"까지의 범위에 있지 않은 모든 문자를 찾습니다.
{n} 정확히 n개를 찾습니다. n은 음이 아닌 정수입니다. o{2}는 "Bob"의 "o"는 찾지 않지만 "food"에 있는 두 개의 "o"는 찾습니다.
{n,} n개 이상을 찾습니다. n은 음이 아닌 정수입니다.
*{0,}와 같습니다.
+{1,}와 같습니다.
o{2,}는 "Bob"의 "o"는 찾지 않지만 "foooood"에 있는 모든 "o"는 찾습니다.
{n,m} n개 이상 m개 이하를 찾습니다. nm은 음수가 아닌 정수이며, nm보다 작거나 같습니다. 쉼표와 숫자 사이에 공백이 있으면 안 됩니다.
?{0,1}과 같습니다.
검색되는 문자열이"1234567"일 때 \d{1,3}은 "123", "456" 및 "7"을 찾습니다.
(pattern) pattern을 찾고 일치하는 항목을 저장합니다. JScript에서는 exec 메서드가 반환한 배열 요소에서 저장된 일치 항목을 검색할 수 있습니다. 괄호 문자 ( )를 찾으려면 '"\(" 또는 "\)"를 사용합니다. (Chapter|Section) [1-9]는 "Chapter 5"를 찾고, 나중에 사용하기 위해 "Chapter"를 저장합니다.
(?:pattern) pattern을 찾지만, 일치 항목을 저장하지는 않습니다. 즉, 일치 항목이 나중에 사용할 수 있도록 저장되지 않습니다. 패턴의 일부를 "or" 문자(|)를 사용하여 결합할 때 유용합니다. industr(?:y|ies)industry|industries와 같습니다.
(?=pattern) 긍정 lookahead입니다. 일치 항목을 찾은 후 일치한 텍스트의 앞에서 다음 일치 항목에 대한 검색을 시작합니다. 일치 항목은 나중에 사용하기 위해 저장되지 않습니다. ^(?=.*\d).{4,8}$는 암호가 4-8개의 문자로 구성되고 적어도 하나의 숫자를 포함하도록 하는 제한을 적용합니다.
패턴 내에서 .*\d는 임의 개수의 문자와 그 다음에 숫자가 오는 경우를 찾습니다. 검색되는 문자열이 "abc3qr"일 때 이는 "abc3"과 일치합니다.
.{4,8}은 일치 항목의 뒤가 아니라 앞에서 시작해서 4-8개의 문자열을 찾습니다. 이는 "abc3qr"과 일치합니다.
^$는 검색되는 문자열의 시작 및 끝에서 위치를 지정합니다. 이는 검색된 문자열에 일치된 문자 밖의 문자가 포함되어 있으면 일치하지 않는 것으로 하기 위한 것입니다.
(?!pattern) 부정 lookahead입니다. pattern과 일치하지 않는 검색 문자열을 찾습니다. 일치 항목을 찾은 후 일치한 텍스트의 앞에서 다음 일치 항목에 대한 검색을 시작합니다. 일치 항목은 나중에 사용하기 위해 저장되지 않습니다. \b(?!th)\w+\b는 "th"로 시작하지 않는 단어를 찾습니다.
패턴 내에서 \b는 단어 경계를 찾습니다. 검색되는 문자열이 " quick "일 때 이는 첫 번째 공백과 일치합니다. (?!th)는 "th"가 아닌 문자열을 찾습니다. 이는 "qu"와 일치합니다.
\w+는 일치 항목의 앞에서 단어를 검색합니다. 이는 "quick"과 일치합니다.
\cx x로 표시된 제어 문자를 찾습니다. x의 값은 A-Z 또는 a-z 범위에 있어야 합니다. 그렇지 않으면 c가 리터럴 "c" 문자로 간주됩니다. \cM은 Ctrl+M이나 캐리지 리턴 문자를 찾습니다.
\xn n을 찾는데, 여기서 n은 16진수 이스케이프 값입니다. 16진수 이스케이프 값은 정확히 두 자리 길이여야 합니다. ASCII 코드가 정규식에 사용될 수 있습니다. \x41은 "A"를 찾습니다. n은 정확히 두 자리여야 하므로 \x041은 "\x04" 다음에 "1"을 쓴 것과 같습니다.
\num num을 찾는데, 여기서 num은 양의 정수입니다. 이는 저장된 일치 항목에 대한 참조입니다. (.)\1은 두 개의 연속된 동일 문자를 찾습니다.
\n 8진수 이스케이프 값이나 역참조 중 하나를 식별합니다. \n 앞에 n개 이상의 캡처된 하위 식이 오면 n은 역참조입니다. 그렇지 않고 n이 8진수(0-7)이면 n은 8진수 이스케이프 값입니다. (\d)\1은 두 개의 연속된 동일 숫자를 찾습니다.
\nm 8진수 이스케이프 값이나 역참조 중 하나를 식별합니다. \nm 앞에 nm개 이상의 캡처된 하위 식이 오면 nm은 역참조입니다. \nm 앞에 n개 이상의 캡처된 하위 식이 오면 n은 뒤에 리터럴 m이 오는 역참조입니다. 이러한 조건이 하나도 없으면 \nm은 8진수 이스케이프 값 nm을 찾습니다(nm이 8진수(0-7)인 경우). \11은 탭 문자를 찾습니다.
\nml n이 8진수(0-3)이고 ml이 8진수(0-7)인 8진수 이스케이프 값 nml을 찾습니다. \011은 탭 문자를 찾습니다.
\un n을 찾는데, 여기서 n은 네 자리 16진수로 표현된 유니코드 문자입니다. \u00A9는 저작권 기호(©)를 찾습니다.
다음 표에는 인쇄할 수 없는 문자를 나타내는 이스케이프 시퀀스가 들어 있습니다.
문자 일치 항목 포함되는 옵션
\f 용지 공급 문자 \x0c\cL
\n 줄 바꿈 문자 \x0a\cJ
\r 캐리지 리턴 문자 \x0d\cM
\s 모든 공백 문자. 공백, 탭 및 용지 공급 문자가 포함됩니다. [ \f\n\r\t\v]
\S 공백이 아닌 모든 문자 [^ \f\n\r\t\v]
\t 탭 문자 \x09\cI
\v 세로 탭 문자 \x0b\cK
정규식은 수식과 유사하게 왼쪽에서 오른쪽으로 계산되고 우선 순위를 따릅니다.
다음 표에서는 정규식 연산자를 우선 순위가 높은 것부터 순서대로 설명합니다.
연산자 설명
\ 이스케이프
(), (?:), (?=), [] 괄호와 대괄호
*, +, ?, {n}, {n,}, {n,m} 수량자
^, $, \anymetacharacter 앵커와 시퀀스
|교체
문자는 교체 연산자보다 더 높은 우선 순위를 가지므로 예를 들어 "m|food"로 "m"이나 "food"를 찾을 수 있습니다.